Lemon Herb Chicken Tray Bake
A practical lemon herb chicken tray bake with potatoes, carrots, and a bright pan sauce, built for a weeknight dinner that still feels generous.
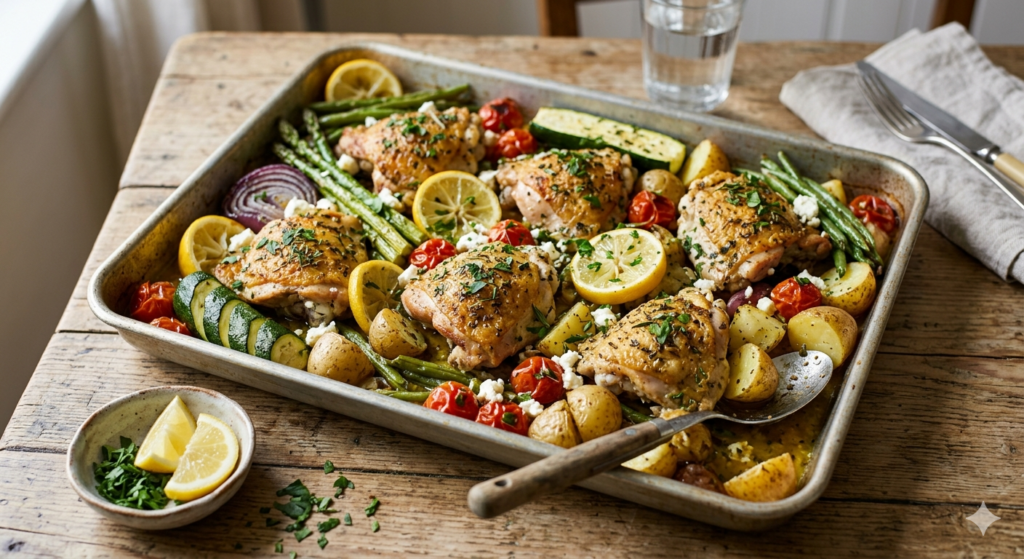
This tray bake is useful when you want dinner to feel complete without managing three pans at once. The chicken roasts over potatoes and carrots, the lemon softens into the juices, and the herbs give the whole pan a fresh finish.
This recipe lives in Main Dishes and is written for home cooking, with clear steps and realistic ingredient guidance.
Why this recipe works
This recipe is written for ordinary home kitchens, with clear steps and enough context to help readers understand the timing, texture, and small decisions that shape the final result.
The goal is repeatability. Readers should be able to cook it once, learn what matters, and come back later with confidence instead of guessing their way through the process.
Quick snapshot
Ingredients
- 6 bone-in chicken thighs
- 700 g small potatoes, halved
- 3 carrots, cut into batons
- 1 red onion, cut into wedges
- 1 lemon, thinly sliced
- 3 tbsp olive oil
- 2 tsp dried oregano
- 1 tsp sweet paprika
- 3 garlic cloves, crushed
- 1 small handful parsley
- salt and black pepper
Method
- Heat the oven to 200 C and line a large baking tray with parchment.
- Toss potatoes, carrots, onion, lemon slices, olive oil, oregano, paprika, garlic, salt, and pepper directly on the tray.
- Pat the chicken dry, season it well, and place it skin-side up over the vegetables.
- Roast for 40 to 45 minutes, turning the vegetables once, until the chicken is golden and cooked through.
- Rest the tray for 5 minutes, spoon the pan juices over the chicken, and finish with chopped parsley.
Key ingredients and adjustments
What matters most here is balance between the main ingredient, the supporting vegetables or base, and the source of acidity. A good result comes from proportion, not from pushing one sharp flavor too hard.
If you swap ingredients, keep the balance between salt, natural sweetness, and acidity in mind. Small corrections, made after tasting, are safer than one large correction at the end.
Before you start
Read the recipe once before you start and prep the ingredients in advance so you can cook without unnecessary pauses between the important steps.
Adjust heat and seasoning gradually. In home cooking, small corrections made at the right time are usually more useful than one large correction at the end.
Success notes
Use a tray large enough that the vegetables sit in one loose layer. If everything is crowded, the chicken will steam and the potatoes will soften without getting the roasted edges that make the dish satisfying.
Acidity is easiest to control near the end. Add lemon, vinegar, brine, or another sharp element gradually, tasting between adjustments so the final dish stays balanced.
Common mistakes
- Leaving garlic over high heat for too long can turn it bitter and shift the whole flavor profile.
- Seasoning only at the very end often leads to a dish that is technically finished but flatter than it should be.
Serving ideas
Serve the dish at the moment its texture is at its best and pair it with something simple that keeps the meal balanced. The suggested related recipes and guides are there to help readers turn one page into a fuller menu.
Storage
Cool the dish promptly, store it in a clean sealed container, and adapt the storage temperature to the main ingredients. When in doubt, chill faster and use it sooner rather than stretching the timeline.
Frequently asked questions
Can I make part of this recipe ahead of time?
Usually yes. Ingredient prep, partial cooking, or a controlled rest can often be done in advance, as long as the final texture-sensitive steps are saved for the right moment.
How do I keep the texture from going wrong?
Watch heat, moisture, and timing more closely than the clock alone. Most texture problems come from rushing, using too much dry ingredient too early, or skipping small adjustments during cooking.
How should I store leftovers?
Cool the food safely, store it in a sealed container, and reheat only what you plan to eat. The exact storage window depends on the ingredients and how the dish was handled after cooking.
Note: always check allergens and adapt the recipe to your ingredients and needs.