
Why Your Onions Never Caramelize Right (And How to Fix It)
If you've ever stood at the stove for 10 minutes waiting for onions to turn golden and sweet — only to end up with something pale and slightly burnt — you're not alone....
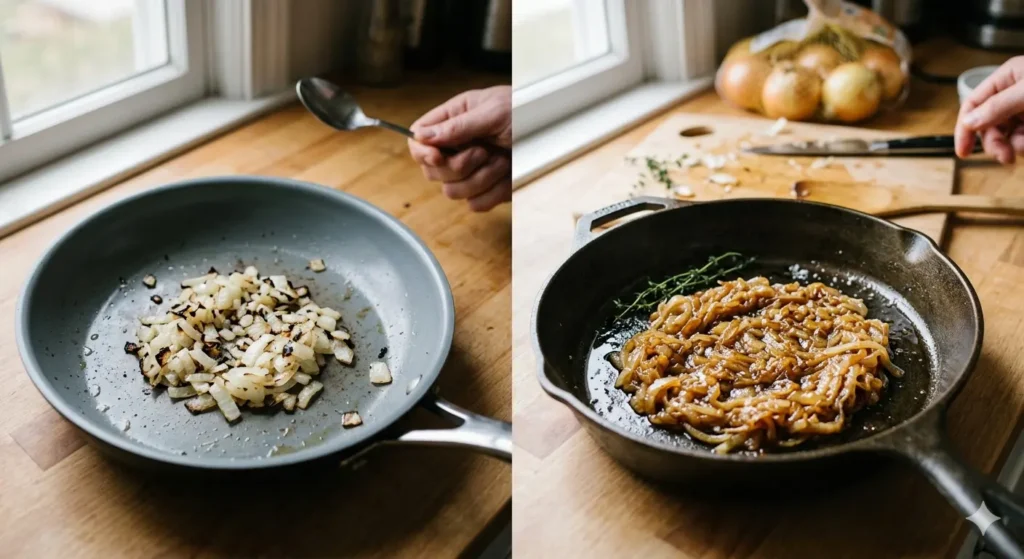
If you’ve ever stood at the stove for 10 minutes waiting for onions to turn golden and sweet — only to end up with something pale and slightly burnt — you’re not alone. This is one of the most common frustrations in home cooking, and the fix is simpler than you think. But first, you need to understand what’s actually going wrong.
What to know first
Caramelization is not a quick process. That’s the single most important thing to understand. Most recipes that say “caramelize onions in 10 minutes” are either wrong or using the word loosely. Real caramelized onions — deeply golden, soft, and sweet — take 35 to 45 minutes over low to medium-low heat. There are no shortcuts that give you the same result.
Why this matters
Onions appear in hundreds of dishes: soups, tarts, pasta sauces, burgers, and quiches. When they’re properly caramelized, they add a depth of sweetness and savory flavor that transforms the whole dish. When they’re rushed and half-cooked, they taste sharp, a little bitter, and heavy. Getting this right makes a real, noticeable difference to the food you’re putting on the table.
The practical answer
The reason your onions don’t caramelize properly usually comes down to one of three things: the heat is too high, the pan is too small, or you’re not giving them enough time. High heat makes them steam and then burn before the natural sugars have time to develop. A crowded pan traps moisture and the onions end up stewing instead of browning. And impatience — which is completely understandable — means pulling them off the heat too early.
Step-by-step guidance
Start with a wide, heavy pan. Cast iron or a thick-bottomed stainless steel pan work best. A wide surface means more contact with heat and faster evaporation of moisture.
Slice your onions evenly, about half a centimeter thick. Too thin and they fall apart; too thick and they take even longer.
Add a generous amount of butter, or a mix of butter and oil. The butter adds flavor; the oil raises the smoke point so it doesn’t burn.
Set your heat to medium-low. You should hear a gentle sizzle, not a sharp one.
Stir every few minutes in the beginning, then less often as they start to soften and shrink. After about 15 minutes, they’ll look pale and limp. This is normal. Keep going.
Around 25 to 30 minutes, you’ll start to see golden color developing at the edges. This is when you need to pay attention and stir more regularly.
By 40 minutes, they should be a deep amber color, very soft, and smell sweet and rich. That’s your target.
If they start to stick, add a small splash of water or stock and scrape the bottom of the pan. This is called deglazing, and it helps lift the flavor stuck to the pan back into the onions.
Common mistakes
Turning up the heat to speed things along. This is the most common error. It creates brown patches from burning, not from caramelization.
Adding salt too late. A pinch of salt at the start actually helps draw out moisture and speeds the process slightly.
Using a small saucepan. Onions need space to spread out so moisture escapes.
Walking away for too long without stirring. The last 15 minutes especially require your attention.
Adding too many onions at once. They cook down dramatically — about four large onions will give you roughly one cup of caramelized onions.
Best tips for home cooks
Make a large batch and freeze them in portions. Caramelized onions freeze beautifully and take almost no space in the freezer. You’ll thank yourself later.
A pinch of baking soda added early speeds up browning. Use it sparingly — just a small pinch for a whole pan — or they can turn mushy.
A small splash of balsamic vinegar at the very end deepens color and adds a mild tang.
Don’t skip the butter. Oil alone works, but butter gives a richer, more complex flavor that makes the final dish noticeably better.
When to use this advice
Use this method whenever a recipe calls for caramelized onions — French onion soup, onion tart, liver and onions, homemade burgers, or a simple pasta. You can also use properly caramelized onions as a topping for grilled chicken, stirred into mashed potatoes, or spread onto bread with cheese. Once you have a batch ready, you’ll find uses for them everywhere.
FAQ:
Q: Can I caramelize onions in the oven? A: Yes. Spread sliced onions in a roasting tin with butter and a pinch of salt, cover with foil, and cook at 180°C for about an hour, removing the foil for the last 15 minutes to brown them.
Q: Which onions work best? A: Yellow or brown onions are the classic choice because of their higher sugar content. White onions work too. Red onions caramelize well but turn a darker, purplish color.
Q: Why do my onions keep burning on the bottom? A: Your heat is too high, or your pan is too thin. Lower the heat and add a small splash of water when they start to stick.
Q: How long do caramelized onions keep in the fridge? A: Stored in a sealed container, they keep well for up to five days in the refrigerator.
Conclusion:
Caramelizing onions is one of those kitchen skills that feels slow the first few times, and then becomes second nature. Once you understand that time and low heat are the ingredients — not just the onions and butter — the results are consistently good. Make a big batch on a Sunday afternoon, keep some in the fridge, freeze the rest, and you’ll have something genuinely useful ready to go all week. That’s real cooking: not complicated, just patient.
To continue, also see:
